Friday, December 25, 2009

Merry Christmas!


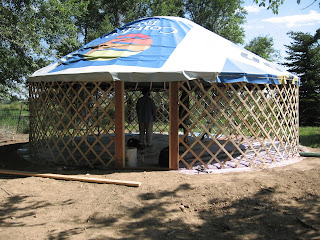
Merry Christmas from the yurt!

Monday, November 16, 2009

The Insulation Circus

When I worked construction, I noticed that insulation crews were often... nontraditional. A panel van would pull up to the jobsite and out would spill 15 old women, 3 dogs, and a goat. So when I went to insulate my yurt, I thought: where am I going to get a goat? As it turned out, we had to insulate sans bovids. Luckily, I do have several friends with acute memory loss, so I'm able to convince them to help me out more than once.

First up was the cotton. I had tired fairly quickly of the black backside of the billboards that were my cover material, and decided that my yurt would look much prettier with a white background. That went pretty fast.


Oh hai!
Then came the actual insulation. If you remember from previous posts, I had decided to use concrete blankets as insulation. They are used by contractors to keep freshly poured concrete from freezing. They are essentially multiple layers of bubble wrap and tarpaulin quilted together. The ones I got were in horrible condition, and needed a lot of work to get them usable. But at ten bucks a piece, they were still worth it. And as a plus, they had a reflective coating on one side!


Fuzzy wore tie-dye, in keeping with the carny/gypsy aesthetic.


It was a relatively painless process, taking up a full day at a more than leisurely pace. I then replaced the cover, this time turning it inside out to make it a little less... commercial. After all, black is the new, um, black. Good thing we got it on when we did, because this happened fairly soon afterward:


But that's a story for another day...


Friday, November 13, 2009

Graywater System

The next step to habitation after I built the yurt was the graywater system. I needed drainage from my shower, the bathroom sink, and the kitchen sink. The toilet is a dry system, so no drainage necessary there. Looking around at the different options for graywater, I realized that most are designed for the typical four person household output of 50-75 gallons(190-280 L) a day. My output is drastically lower: somewhere around 15 gallons(57 L) a day. So I'm yet again stuck designing a system from scratch. Here's what I came up with:

First, you dig a hole.


Cut a 50 gallon drum in half and drill holes in the bottom.


Put the barrel in the hole, layer with large rocks, small rocks, pebbles, and sand to create a filter. Put the top back on the barrel.


Dig your trenches. In order to drain properly, the slope needs to be 1/4 inch to the foot. Yes, that's a microwave in the picture; and no, I have no idea why.


Here's the barrel buried and ready to be plumbed.


That's 2" ABS pipe.


I put a p-trap outside in case I lose anything important down the drain. Don't want to be digging that barrel back up if I don't have to. Insulated the access box with hay so it doesn't freeze.


Here's the pipe inside buried. From left to right, we have bathroom sink, kitchen sink, and the bottom is the shower flange.


This system should be able to handle all my drainage needs. I'll take care not to wash too many food particles down the kitchen drain so as not to clog up the system. I will also be using biodegradable soaps whenever possible.

Saturday, September 12, 2009

Yurt Raising!


It was a gorgeous day, and we started early. My yurt was finally assembled and ready to put up. I had run into issues acquiring enough recycled lumber for the deck, so I decided to build the yurt on the ground. I had previously raised the height of the yurt site about a foot, then used a transit and plate compactor to level it. I then put a layer of billboard material(fiber reinforced PVC) down as a moisture barrier.

After that, we laid out the khana(wall) sections and assembled them.


That's 850 10-24 1&1/4" bolts!


After that, we stood the wall up, expanded it, and attached the door.


Then came running the support cable and building of the scaffolding for the roof ring.


By this point, our supervisory task force was at the peak of their game.


What you don't see in the pic below is the 3 people holding the scaffold up. I built it from memory, and was about a foot short in height. Sorry, guys!


After we got a few in, the scaffold could be removed.(set down?)


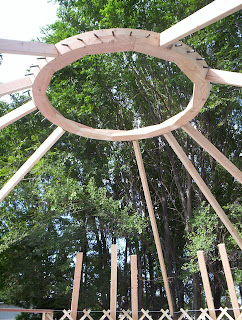
From there it was easy going, one rafter after another, until we reached the magic number of 42 rafters(no joke!). Had to be careful to keep the roof ring level.

The crew at the end of day 1.

The cover went on super fast the next day!


Next I'll cover the insulation!

Wednesday, August 26, 2009

Ladies and Gentlemen, I give you the yurt

Lately, things have been a bit dry around here when it comes to new posts. I've been a little busy... putting up my yurt!


I know, I know - What about 'the making of'? I'll be doing step-by-step how-to's on each step of the yurt later on. In the meantime, I'll take you through the yurt raising.
'Till then,

Thursday, July 9, 2009

Bees!

A couple weeks back, a good friend of mine's feral honeybee hive on his property swarmed. If you didn't know, this is how honeybees reproduce. When a hive gets too crowded, a new queen is born and she leaves, taking about half the worker bees with her. The swarm gathers on a branch near the main hive while scouts look for a new hive location. This stage is where I found them. The sun had just come out after a rain, and the bees were still tightly huddled together and relatively docile.


After my first shot, I decided that I should get a little closer. I grabbed a 10-foot stepladder and climbed up.


Being up in a tree with several thousand bees is quite an experience.

Tuesday, June 30, 2009

Yurt Plans, Part 3: Water and Sanitation

The next question to consider once I decided on shelter and power was twofold: Where do I get water for bathing, cooking, and drinking and what do I do with it when I'm done? The first portion of that is relatively simple. I can get a used food-grade 50 gallon barrel for relatively cheap, so that will be my storage. But then what to do with wash water when I'm done?

That leads to another, more difficult question. What do I do with my, erm, gastric byproducts?

{disclaimer: from this point forward I will be discussing the composting of human excrement, that is to say, poop. There may be attempts at low-brow scatological humor. If this subject makes you uncomfortable, it's okay. I'm not extremely comfortable with it myself. Fecophobia is very common in western culture. Let's step right in, shall we?}

My first thought was, ewww, I really don't want to be up to my elbows in... hard work trying to dispose of my wastes. I was hoping to find some magic solution to just make it go away; but as my old boss used to say, you can wish in one hand and... Oh, never mind. What I ended up learning was that there are only a few ways to have an off grid toilet.

The first one most of us are familiar with- the latrine. Just a hole in the ground that you do your business in. Smelly, cold in the winter, hot in the summer, and, as it turns out, horrible for the environment. Latrines don't actually treat the waste, they just wait for anaerobic decomposition to take place. In the meantime, pathogens are leaching into the surrounding soil and can travel up to 50 feet laterally. In addition, when it fills up, a new one needs to be dug or the old one scooped out. No thanks.

Another method is incineration. There are commercial toilets that use an electric element to incinerate your deposits. Periodically you remove a sort of dust from a tray below the toilet and discard that. This method works well, but requires an obscene amount of energy and can stink.

The third method is composting. I started looking at commercial composting toilets, and found that, while efficient and odorless, they cost around $2000 each. That's more than twice my yurt budget! I was starting to think I was up a creek and out of luck, but then I found The Humanure Handbook by Joseph Jenkins.


This self-published 250-page volume outlines a composting toilet system in which the actual composting takes place in an outdoor compost pile, and the toilet is simply a receptacle that gets emptied periodically. But that's not the interesting part of the book. Jenkins makes a carefully researched, well-supported case for large scale 'humanure' composting. He points out that all creatures in nature form a nutrient cycle with their environment and nothing leaves the system. He then contrasts that with our current nutrient cycle:


Interesting point, but what about smell and disease? Jenkins says that, done properly, this system has no odor and the composting temperature will kill all harmful pathogens to the point that the compost can be used to grow food. Cool.

Jenkins' book is available from Amazon or the publisher's website: www.jenkinspublishing.com. The first edition of the book is available for free on the website.

Whew!

Man, the last month has been busy! Maker Faire was so fantastic with so much to see that it's taken me a while to go through all the pictures. Here's a small sampler of what was at Maker Faire:

Cardboard composite surfboards-


3d printers-


Steampunk bands-


Folks with mechanical faun legs-


And robot builders of all sorts-


It was definitely worth going to, and I think I'll go next year.

Wednesday, May 27, 2009

Stay Tuned for Maker Faire Updates!

Hey folks! I'm heading to the Maker Faire in the San Francisco Bay area next weekend. Kind of like a science fair, but instead of baking soda volcanoes and styrofoam solar systems, you get musical Tesla coils and crocheted elder things. Each night I'll upload pics and commentary. Until then, have a video of a musical Tesla coil:

Monday, May 18, 2009

De-grime-ification System Update

I now have a shower! Picked up a fully enclosed fiberglass shower stall. It, of course, went on the Subie:


The drive home was, to say the least, interesting. It got a bit windy, thought I was going to blow off the road.

Monday, May 4, 2009

Insulation: Accomplished

Picked up a lot of ten concrete blankets for $100 at ReSource. Stacked all ten on top of my Subaru:


Got a lot of funny looks on the way home, for some reason.

Friday, April 3, 2009

W00t! Wood!

Sears Trostel was kind enough to donate some of their straightlining offcuts to the cause:


It's a mix of different hardwoods, mostly poplar and alder (I think). There were some pretty big pieces in there, some up to 2 1/2." This should be enough for the khana wall sections and possibly the rafters (with the bigger pieces). If it's not, they have lots more.

Cool thing about Sears Trostel: I thought that sawdust just gets thrown away, but they let me know that theirs gets sold as animal bedding. It's good to see industry repurposing their waste materials.